
For many of us, summertime means vacation time. Get out that bright, splashy-colored Hawaiian shirt, plaid shorts, and big, floppy hat, because it’s time for fun and relaxation. If you have diabetes, you need to get from point A (your house) to point R&R (your vacation getaway) in a healthy way. Diabetes doesn’t limit your ability to travel. But you need to plan ahead and take precautions so that while you’re getting away from it all, your blood sugar isn’t getting away from you. Whether you’re loading up the family wagon or hopping a jet, these 10 sensible tips will make your travel smoother and vacation more enjoyable.
Check with your doc. It’s always a good idea to have a thorough exam before going on a trip. Knowing everything is fine and dandy will ease the travel anxiety you might experience before hitting the road.
Prep for security. Expect your diabetes supplies to be noticed and possibly questioned by airport security. But rest assured, the U.S. Transportation Security Administration (TSA) will allow you to board a plane with insulin, syringes, and an insulin-delivery system. You can carry lancets on board as long as they’re capped and can carry a glucose meter with a manufacturer’s name printed on it. At the security checkpoint, mention to the screener that you’re diabetic and have your supplies. That little heads-up will make the process smoother and quicker.
Bring along scripts. While prescriptions or a doctor’s letter aren’t necessary when traveling, it’s a good idea to have them handy. If you have them, it makes it much easier to refill any medication. Also, have your doctor provide a printout of all your medications in case you need medical attention on vacation. And also be sure that nonprescription items are clearly labeled and in their original containers.
Keep supplies close. Especially if you’re traveling by plane, keep your insulin, syringes, test strips, and other supplies in your carry-on luggage and within arm’s reach. You could pack extra supplies in your checked luggage, but be sure you have enough at hand to endure tarmac delays or summertime traffic jams.
Double up supplies. Bring about twice as much diabetic supplies as you think you’ll need. It’s easier to carry extra than to get more on the road.
Wear life-saving bling. If you don’t already have one, get a medical ID bracelet or necklace that alerts people that you have diabetes and provides emergency numbers.
Pack a snack. Wherever you go, take a portable snack, such as an apple, energy bar, banana, raisins, or cheese and crackers in case your blood sugar starts to dip when you don’t have immediate access to food. If you munch on snacks en route, don’t forget to replenish your supplies.
Eat by the clock. When traveling, stick to your regular mealtime schedule to keep your blood sugar stable. When that’s not possible, carry glucose tablets and be alert to symptoms of low blood sugar, such as nervousness, sweating, and crankiness. If you feel a hypoglycemic episode coming on while driving, pull over and take several glucose tablets. Wait at least 10 or 15 minutes for the feeling to pass before becoming a road warrior again.
Soothe your soles. Pack two pairs of comfortable shoes, so you can air out one pair while strolling around in the other. Shoes should be broken in before the trip, so leave new ones at home. Be cautious around places that can harm your tootsies. For example, wear water shoes at the beach to protect your feet from hot sand, rough sidewalks, and sharp pebbles. Bring a baggie with several sheets of moleskin and bandages as a first-aid kit for your feet.
Zone in on zones. Traveling across time zones can throw off your normal insulin and meal schedule. A good rule of thumb: When adding hours to your day as you travel west, you may need to take more insulin. When losing hours by traveling east, you may need less. And to ease into a new time zone, stick to your old schedule one evening, then switch your watch and your insulin schedule the morning after you arrive.
Featured Recipe
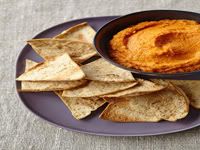 Roasted Red Pepper and Chickpea Dip with Pita Chips
The chickpea is a near-perfect food, delicately flavored and rich in protein, fiber, folate, iron, and zinc. Not only that, but the chickpea is a culinary wonder that blends well in everything from soups to salads to stews—and in this deliciously healthy dip.
Serves 12
Ingredients:
1 1/2 teaspoons ground cumin
1 can (14 1/2 ounces) no-salt-added chickpeas, rinsed and drained
1/2 cup rinsed, drained, and coarsely chopped jarred roasted red bell peppers
2 tablespoons extra-virgin olive oil
2 tablespoons fresh lemon juice
1/2 teaspoon minced garlic
1/4 teaspoon ground red pepper
2 whole-wheat pita breads
Preparation:
1 In a small skillet set over low heat, heat the cumin until it becomes fragrant, about 2 minutes.
2 Puree the cumin, chickpeas, bell peppers, oil, lemon juice, garlic, and ground red pepper in a food processor until smooth. Scrape into a container and refrigerate until the flavors are blended, about 1 hour.
3 Preheat the oven to 350°F. Coat a jelly-roll pan with nonstick cooking spray. Separate the pitas along the edges to make four flat circles. Stack and cut them into six pie-shaped wedges. Spread in a single layer on the prepared pan and bake until golden, 12 to 15 minutes. Serve with the dip.
Per serving (2 tablespoons): 33 cal, 1 g fat, 0 g sat fat, 4 g carbs, 1 g protein, 1 g fiber, 0 mg chol, 33 mg sodium, 8 mg calcium
Great Ideas
Great Ideas
5 Ways to Make Mexican Food Healthier
Whether you’re fixing Mexican food at home or eating out at your favorite south-of-the-border-themed restaurant, dining on this ethnic fare can be a blood-sugar challenge. Portions are usually huge, with tortillas bigger than your head, and piles of white rice and cheese smothering everything. To still say “ole,” here are five tips for Mexican dining.
1. Ditch the chips. Ask the waitperson to take away the tortilla chips. As the Mexican equivalent of a big breadbasket, those chips are loaded with carbs and fat (they’re fried, remember?).
2. Go soft. For your tacos or to scoop up healthy dips like guacamole, opt for soft tacos. The hard versions (or chips) are fried. Another reason to forget chips: Each one has about 1 gram or more of fat.
3. Be app smart. Fortunately, there are plenty of healthy appetizer choices for your Mexican fiesta. For example, order or make your own ceviches (marinated raw fish or seafood), and soups like spicy cold gazpacho (vegetable), black bean, and tortilla.
4. Make fajitas the main course. Made with lean beef, chicken, or shrimp and grilled with onions and peppers, fajitas don’t have fatty ingredients in other dishes.
5. Opt for black beans and rice. Even if you have a sensible entrée, side dishes can bust your diet plan. Because of the beans, this dish has a lower GL than rice alone. Just make sure the beans aren’t refried, because those hombres can be loaded with fat. Many Mexican restaurants offer black beans as an alternative to refried—a perfect choice.
No comments:
Post a Comment